
With podcasts and any kind of audio, the raw sound you record is rarely going to be the end product that people hear. There are a number of post production effects, also known as FX, that can help you craft a more pleasing sound for your podcast. Today we’re explaining one of the most basic types of processing: equalization, or EQ. We’ll cover the EQ steps that every podcast creator should be taking with their vocal tracks in order to achieve a better and more professional sound.
What is EQ?
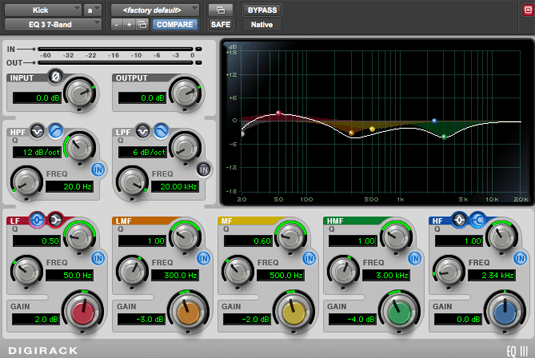
EQ refers to the shaping of an audio’s sound through a process of boosting or cutting certain frequencies along the audio’s electronic signal. Equalizers look different depending on the plugin you’re using. They can be analog, featuring a number of knobs that are reminiscent of music studios’ mixing boards. These days, many plugins are parametric equalizers, meaning they display a bell curve-like graph which dynamically represents a signal’s frequency. This graph ranges from the lower rumbles of 50 Hz to the high-pitched sounds of 20kHz.
Most digital audio workstations (known as DAWs) come with a standard EQ plugin that you can use under the FX panel. You can also purchase EQ plugins with more features or different UIs that will integrate with your DAW.
Let’s talk about a few steps you can take with your talk show or narrative podcast’s audio tracks to craft better-sounding vocals, and in turn make for a better overall podcast experience. With each of these steps, you should apply the EQ plugin to each track and adjust them separately, since different voices use different frequencies.
EQ Step 1: Cut out rumble with a High Pass Filter
The most universal EQ step you can take with any dialogue-heavy podcast recording is to apply a high pass filter. A high pass filter (or HPF) is so named because it lets higher frequencies “pass” through while attenuating lower frequencies. A HPF placed at the start of the spectrum will remove the lowest frequencies below 100 Hz. This range often features rumble from AC units, fridge noises, fans, or other room noise that our ears generally ignore. Let’s look at what a high pass filter looks like using the stock EQ tool, ReaEQ, in our DAW of choice, REAPER.

Different EQs are laid out differently, but the settings usually have the same names. Frequency in Hz refers to the part of the spectrum the effect sits at (as visualized by the numbered circle). The Gain (either positive or negative) determines the increase or decrease of a certain frequency range (more on that in the next step). Bandwidth refers to how wide or narrow the effect will have from its position on the spectrum.
Notice how the shaded region begins to drop off around 100 Hz. To reduce rumble, you should set the high pass filter at around 75 - 100 Hz. To figure out where exactly to place it, you can drag the circle way past 100 Hz and slowly move it left toward 0 Hz, noticing how the vocals will move from too thin to warmer while the background rumble is removed. In ReaEQ, you can move the Frequency slider left and right, manually enter a numeric value in the box, or click and drag the red circle to the preferred frequency.
EQ Step 2: Boost or clarify voices by using notches and “sweeping”
If you feel any voices in your podcast sound thin or lack clarity, then you can make small adjustments in the low-mid frequencies (between 100-400 Hz) that can add in warmth or clarity. We’ll make small changes in this range using “notches” and a technique called “sweeping”.
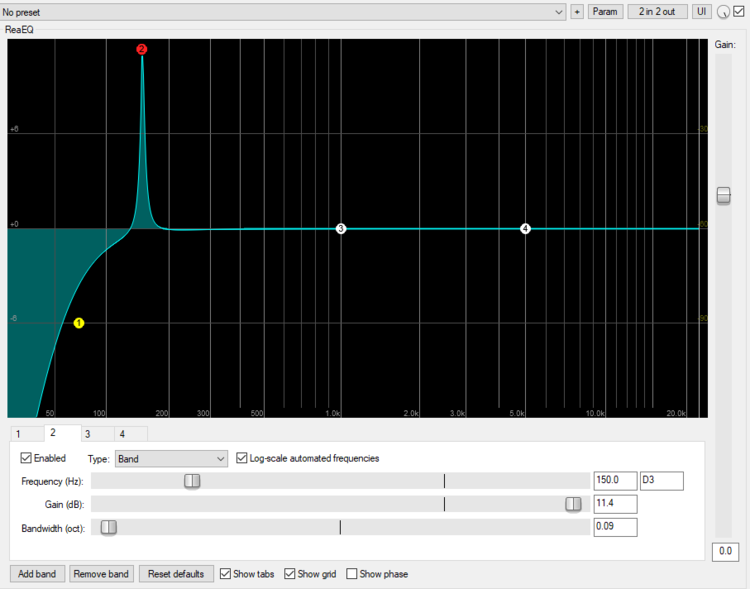
A “notch” is what happens when we use a EQ “band” (as opposed to a high pass filter or another type of adjustment). Bands look like small bumps along the parametric EQ graph. When EQing voices, we want to make small adjustments of 1-5dB to increase (boost) or decrease (cut) frequencies. This allows us to make subtle changes to the sound. Here’s a small notch at the 150Hz frequency:
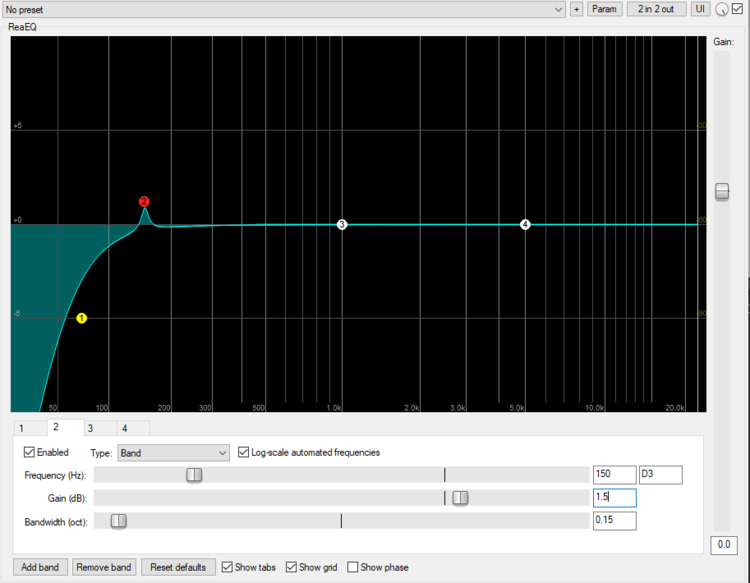
Here, we’ve made a small gain adjustment of +1 dB and lowered the bandwidth to just above 0, so it has a quite narrow effect. But how did we know it should go at 150 Hz?
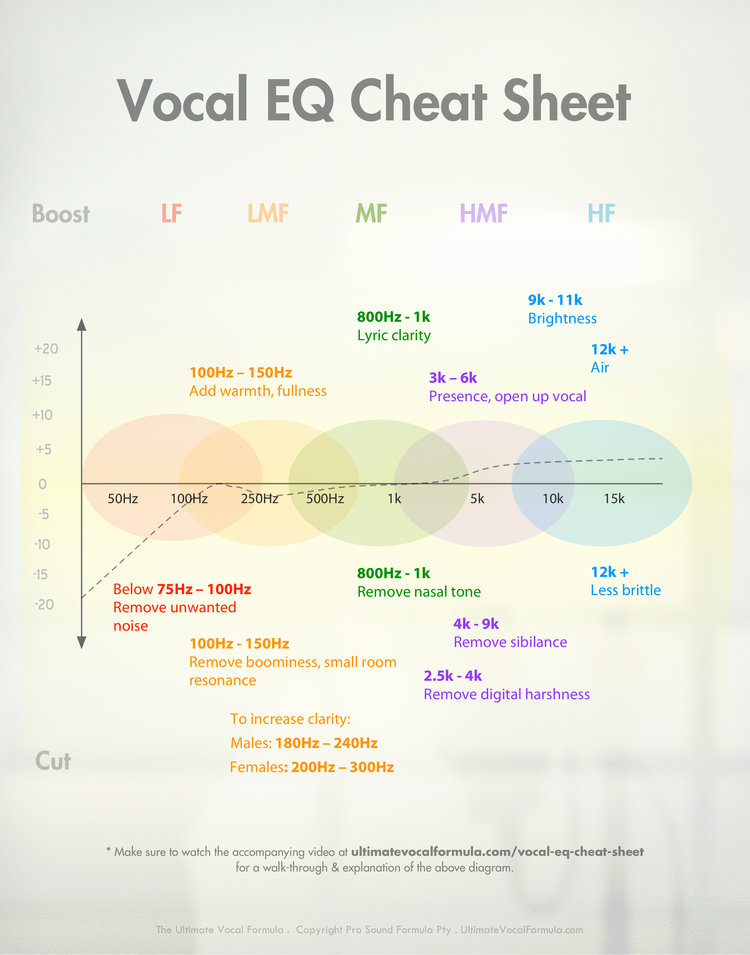
We use two things to figure this out. First, we use reference ranges from producer Rob Williams’ handy Vocal EQ Cheat Sheet (You can download a high-res copy of this chart by right-clicking and saving it):
Second, we find the right frequency within these ranges with “sweeping”. Each person’s voice has its own frequency range, so not every voice will sound great with gain at 150 Hz. To find the right spot, we’ll use “sweeping” in combination with an EQ notch. For example, if we want to add warmth to a narrator’s voice, we’ll sweep along the 100-150 Hz range.
Sweeping is essentially where we move the EQ band through the reference range and identify at which frequency the EQ effect most improves the vocal track. You can make this process easier by (temporarily) increasing the size of the notch by a large amount, over 10 dB. This overstates the EQ change, emphasizing when the EQ is working and when it isn’t. See below:
Increase the notch to overstate the EQ effect while sweeping.
When you’ve increased the notch, start sweeping the band left to right within our range from the Vocal EQ Cheat Sheet. In REAPER, you can move the Frequency slider or click and drag the red circle left and right. It takes some practice, but you’ll eventually hear which frequency makes the improvement you’re looking for. At around 150 Hz, we’ve made the voice warmer without making it sound odd or echo-y. We then reduce the gain to somewhere between +1 and +3 dB, usually around +1.5 dB.
EQ Step 3: Adjust any other mid-range frequencies
We’ll essentially repeat this notch/sweep technique for any other frequency problems we hear in the tracks. We can refer to the Vocal EQ Cheat Sheet to find the specific range to adjust for a particular problem. With all of these gain adjustments, aim for 1 - 3 dB changes.
Note that these adjustments may be unnecessary on vocal recordings in a good environment with a clear speaker. Only apply effects for which you hear a problem in the raw audio.
The following are the most relevant EQ effects for podcasters:
- Add warmth to a voice: If the voice sounds thin or weak. Add gain between 100 - 150 Hz.
- Remove boominess or small room resonance: Useful if the speaker recorded in a large room or an overly small room, like a closet. Reduce gain between 100-150 Hz. Cannot be used in conjunction with the above effect.
- Improve vocal clarity: If the voice sounds muddled, try this range. Reduce gain between 180-240 Hz for men, 200-300 Hz for women.
- Remove nasal tone: If your speaker tends to have nasal sounds that are distracting. Reduce gain between 800 Hz - 1 kHz
- Remove digital harshness: For a recorder/Skype issue or other non-vocal sounds. Reduce gain between 2.5 kHz - 4 kHz.
- Remove sibilence: If your speaker has harsh “ess” sounds in their speech. Reduce gain between 4 kHz - 9 kHz.
EQ Step 4: Open up vocals with a High Shelf
Like the High Pass Filter in the low frequencies, adding a High Shelf at the high-end frequencies is usually a good idea for any vocal track. A High Shelf looks exactly how it sounds - a shelf - one that rises quickly and levels off in the 8 kHz - 20 kHz range. It has the effect of “opening up” a voice and making it lighter and easier to hear.
To create a High Shelf in ReaEQ, we add a new band with the “Add Band” button at the bottom. We then change its type to High Shelf using the drop down menu. Notice how the #4 band turns from a band (notch shaped) to a rising slope:
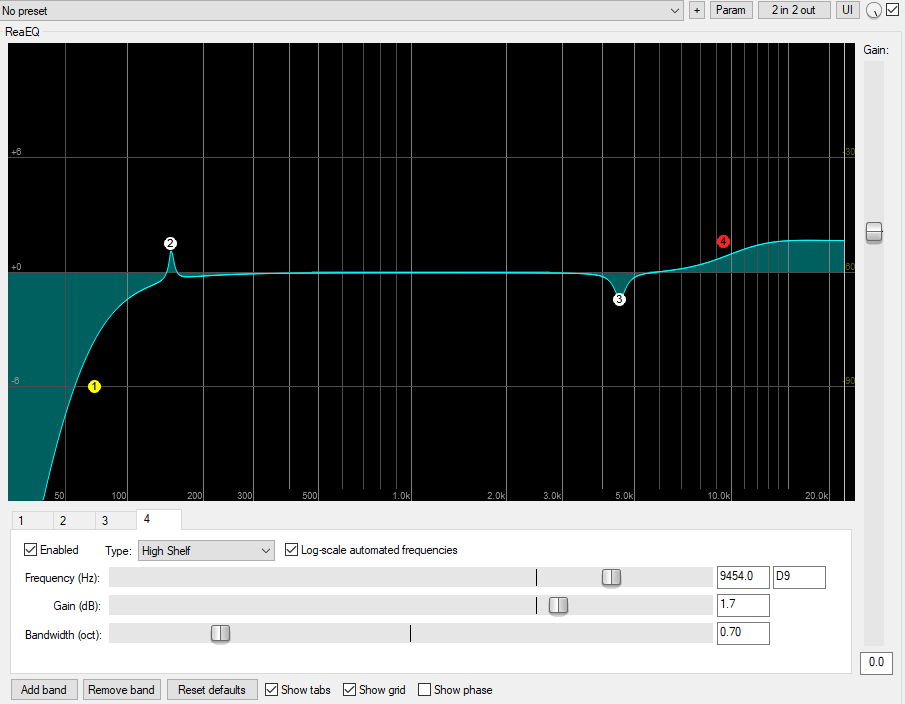
Again, adjusting the Frequency will change the placement of the effect (in this case, where the shelf starts to rise). The Bandwidth affects how severe the slope up will be. Gain is usually fine at +1.5 dB, sometimes +3 dB if the vocals need to be opened up a great deal.
To find where to place the High Shelf, we can again use the “sweeping” technique. First, let’s raise the High Shelf to about 8-10 dB, way higher than we would normally. This will dramatically overstate the effect of the High Shelf.
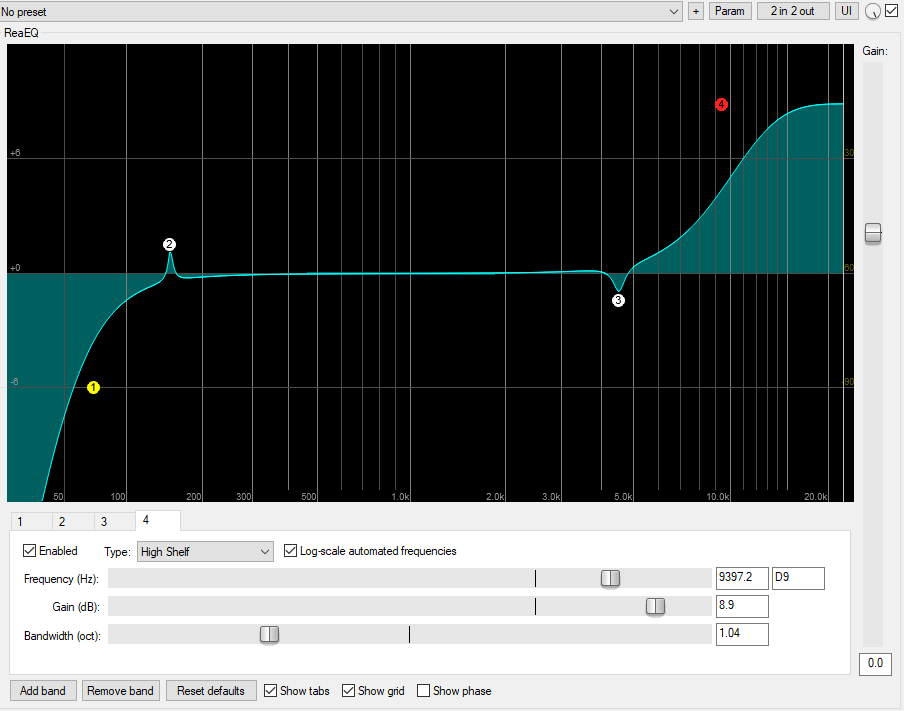
Next, we’ll start the High Shelf at the right end of our reference range (using the Vocal EQ Sheet, we can see that’s 3 kHz - 6 kHz). Play the audio and move the shelf leftwards. The voice will begin to sound high-pitched and muddled, at which point we want to pull back the shelf to the right. Where the voice starts to sound normal again once we’ve pulled it back is where we’ll place the high shelf.
Other resources for podcast EQ
EQ-ing your podcast can take a good amount of practice, so we like these other resources for a more guided look at EQing your podcast:
- Rob William’s Simple EQ Tips video on YouTube, which demonstrates many of the same concepts as his Vocal EQ Cheat Sheet.
- Real World EQ by Transom’s Jeff Towne
- Basic EQ in Hindenburg, for those using the Hindenburg Journalist DAW